
Well, maybe not mine so much, but some of my clasps. I am developing a line of very secure, easy to use, fold-over magnetic clasps that will be integral to the design of my new pieces. I thought it might be interesting to show how such a finding is created. First, I fabricate a prototype in Argentium® sterling silver using wire & sheet metal to fit very high quality & powerful nickel-plated neodymium magnets. After the prototype is completed, a brass rod that will be the channel for wax & later metal to enter is soldered on–these are know as “sprues”. Then a mold of vulcanized rubber is created under heat & pressure. After cooling, the mold is split in half so that later the wax form can be removed. Hot wax is then shot into the mold under pressure. Once the wax is hardened, the wax form is carefully removed from the two halves of the rubber mold. This wax form is then attached to others in a bush-like array & submerged in a plaster-like material to form an “investment”. A powerful vacuum chamber is used to remove air bubbles in the material. Once hardened, the investment is then heated in a kiln overnight to burn out all the wax, leaving voids for the precious metal to enter through the bottom of the “bush”. When we are ready to cast the metal, new metal casting grain or scraps are melted with a large torch & quickly poured into the investment, which is immediately centrifuged to push molted silver though out all the voids into the entire investment. Once cooled, the plaster-like material is soaked off in water & the individual castings can be cut apart & finished. This is commonly know as a “lost wax process” since the wax form is burned away before casting. By making a rubber mold, additional wax forms can be made whenever desired.
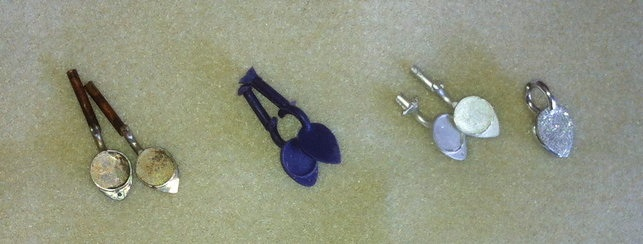
On the far left is the prototype clasp with the brass “sprues” that will allow the metal to enter the mold visible at the top. The purple set next over is the wax form once it has been removed from the rubber mold. Next is the raw casting just cut apart from the rest of the cast & on the far right is the final product, all polished with the magnets installed & a cool sparkly stardust finish. Having a hinge in the clasp adds quite a bit of difficulty in the molding & casting process.
So you see that there is a lot of work & steps that go into making such a custom piece. Hopefully by next week, I will be able to show you the final clasp installed in a necklace as well as some other clasps that I am developing.